×

Login

forgot your login?

Strut Installation Methods & Typical Modes of Failure

Strut Installation Methods & Typical Modes of Failure

01/29/20
Catalina employed different strut designs and mounting methods over the years. This article describes those designs and methods to aid in the understanding and repair of your boat.

Early Catalina 27 and Catalina 30 struts were installed from inside the boat and glassed into place.

In the beginning . . .

Catalina got their start with the Catalina 22. It was such a great little boat that it wasn't long before the market was clambering for a larger Catalina. The first larger offering was the Catalina 27 introduced in 1970. Like the 22 it was equipped with an outboard motor. It was such a capable boat, suitable for longer cruises, that many potential buyers wanted a 27 with an inboard engine. 

Early inboard models including the Catalina 27, Catalina 30, and Catalina 38, used struts that were installed from inside the boat. A common practice at the time, a rectangular hole was cut in the hull and the strut was dropped in from the top and glassed over. Even though it has been 50 years now, we recently located the original pattern for these early 27 and 30 struts in the back corner of a vendor's warehouse. Catalina Direct had a batch made and we have them available for immediate delivery. The early Catalina 38 strut was an unusual Y shape. It is no longer available but we stock a later style that can be retrofitted to a C-38.

New style struts installed from outside the hull became standard in the early 1980s.

A more robust design . . .

Through bolted for strength

As production increased, Catalina learned that cutting a 4” x 3” hole in the hull for the strut was not ideal. They moved to a more robust and secure through bolted design. A molded-in recess was added to the hull to accept an externally mounted strut. Accomplished in the early 1980s, the new design had both better watertight integrity and was easier to repair and replace. Still concerned about leakage, they continued the practice of filling and fiberglassing over the mounting bolts inside the hull. 

With the advent of modern sealants, it was decided that proper bedding, setting, and sealing of the strut and fastening bolts externally was sufficient. Glassing over the nuts and bolts on the interior of the hull was discontinued. This change was made on different models at different times. There are not surviving records that specify the exact dates when these changes were made to each model. Later boats will have exposed nuts and bolts inside. Earlier boats will have the nuts hidden under a mound of fiberglass.

This is an example of the robust two piece style bronze struts required by boats with 1-1/4" diameter shafts.

And for larger prop shafts . . .

A two part story

Catalina continued to expand their offerings with the introduction of the Catalina 42. With a larger engine and larger 1-1/4" shaft, a stronger two piece strut was designed. A female receiver is both bonded and through bolted inside the hull. The male portion of the strut is inserted from below and passes through the receiver. It is then both mechanically fastened and bonded for the entire height of the receiver with 3M 5200 sealant. 

When Catalina created the 470, they commissioned their fabricator to make a two piece stainless strut that was up to the job. There have been several iterations of its design. The most recent design is available as a replacement option on a special order basis.

In the early 2000’s, Catalina did a complete re-design that eliminated the prop strut. It was replaced with a molded fiberglass skeg forward of the prop. The shaft passes directly through and is supported by a cutlass bearing at the aft end of the skeg. The Catalina 28 hull mold was modified to create this strutless configuration, while others like the Catalina 309 and 355 were designed with a strut from the start.

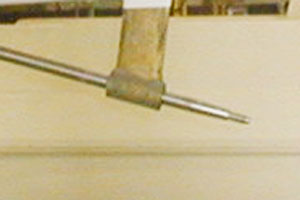
Not a sight you want to see on your next haul out. Tend to those loose dock lines before shifting into gear to prevent the dreaded prop line wrap.

Watch out for the line!

Common failure modes

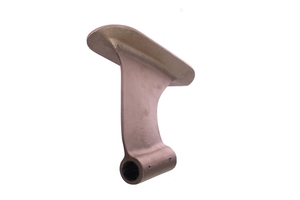
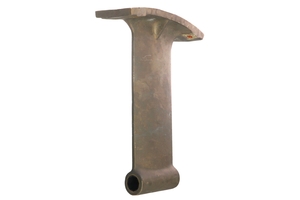
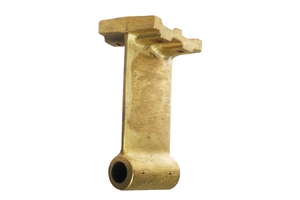
Struts have a long life. The foundry who casts them says to expect 10 to 15 years. In practice we see struts much older than that. But don't expect them to last forever. They do have a finite lifespan. Here are other reasons your strut may need to be replaced:

• A dangling dock line was sucked into the prop while under power. Your diesel's substantial torque will bend the strut toward the cleat every time.
• The strut was damaged while replacing the cutlass bearing.
• The strut and shaft were bent when a lifting strap was inadvertently placed in the wrong location.
• Electrolysis caused by inadequate protection by a zinc anode weakened the strut.
• The boat is being re-powered.


Two ideas that may prevent damage to your strut

The "dinghy captain"

The best way we’ve found to keep lines out of the prop is to appoint a “dinghy captain”. This should not be the skipper, but another member of the crew who will take the job seriously. As soon as anyone announces they’re going to start the engine, the dinghy captain springs into action. Heading to the stern, they check for any sheets or dock lines in the water. They then immediately haul in the dinghy by its painter and snubs it right up to the boat. This ensures the painter cannot fall into the water and wrap itself around the prop. Having a person responsible for this important role can eliminate a lot of headache.

A proper zinc anode

The alloy used by the manufacturer is military grade 70 manganese bronze. Selected for its corrosion resistance and strength, it is still as much as 25% zinc. With age, a process called “bleeding” can occur when the iron and zinc, elements in the alloy, come to the surface significantly reducing the strength of the bronze. This can make a strut's normally bronze color appear pink. Although struts in a Catalina are typically isolated from the boat's electrical system, zincs are recommend for boats in salt or brackish water... and especially for boats in "hot" marinas with a lot of stray electrical current.

Do not wait until your strut gets to this point! Protect it with the appropriate zinc anode and address any engine vibration issues as soon as they are noticed.

The fix

1) Identify the location of your strut inside the boat. If the boat is on the hard, then a reference dimension measured from the transom may be helpful to determine the approximate location inside the boat.
2) Look for possible obstructions. On some boats you may need to remove or move equipment to gain access to the strut or fasteners. On the Catalina 30 for example, the fuel tank is typically the culprit.
3) Determine your installation style; drop in from inside, external install with covered fasteners, external install with uncovered fasteners, or two piece.
4) Determine the appropriate replacement strut for your boat. Catalina Direct stocks most replacement options. All of the parts pictured at the bottom of the page are typically in stock.
5) Call us to confirm availability of parts before scheduling your haul out.

The sacrificial filler below the mounting shoe has been removed from this Catalina 34. The molded-in hull recess is larger than the area where filler in the photo has been removed. Variations in the hand made parts may require removal and replacement of some of the resin/fiber mix above the shoe to achieve a proper angle and fit.

Installation steps

When installing struts, the factory used the prop shaft, coupler, and transmission coupler to align the strut. If only your strut was damaged, then the following are good techniques to use to install your new strut. If your boat experienced a larger event that caused more damage, it may be best for a boat yard to complete the job.

1) Remove the old strut. Clean up the area where the new one will mate against the hull, be it either inside or outside of the hull.
2) Use shims to center the prop shaft in the stern tube where it exits the hull. For boats with a 1” shaft, the inside diameter of the stern tube is 1-1/4”. A 1/8” thick shim will center the shaft in the tube. Cut a short length from a tube with an OD of 1-1/4” and an ID of 1". Next, cut it in half lengthwise. Use the two halves as shims.
3) Once the prop shaft is centered, slide the strut into position. Center the prop shaft to check for any interference issues where the new strut meets the hull.
4) Since your boat and strut are both made by hand, there can be some variation from one to the next. Additional material may need to be added or removed where the shoe meets the hull.
5) Do a final clean up of all surfaces in preparation for the final installation.
6) Use the appropriate factory installation instructions for installing the strut (see "Read more" at the bottom of each strut's display page). Consider if you want to omit the resin and glass layers over the bolts inside of the boat to facilitate tightening in the future.